Now that we’ve learned how to calculate a basic humidification load, we need to understand how to do the same when an economizer cycle is part of our design.
Why is that so important? Because nearly every commercial building in the continental United States is required (per DOE) to incorporate either an air- or water-side economizer. If your state hasn’t already incorporated the ruling into its commercial building code, it’s just a matter of time before it does. And that’s a good thing, because using cool outside air to maintain building temperature is an excellent way to reduce cooling costs.
Proportioning Return and Outside Air
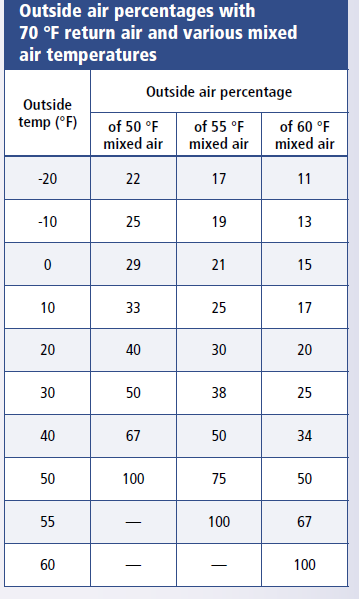
Airside economizers work by mixing outdoor air with building return air in order to maintain the supply temperature to the space – typically about 55°F. Proportions of indoor and outdoor air will vary, of course, depending on what the outdoor air temperature is. The table below from the Dristeem Design Guide shows the percentages of outside air that can be mixed with return air to maintain a 70°F space using one of three mixed-air temperatures.
Determining Outside Air Quantity
As with natural and mechanical ventilation, we must first determine the quantity of outside air in order to calculate what our humidification load will be. Again, there are excellent programs out there that do all the legwork for us, but to impart true understanding, we’re going to work through an example as if such aids don’t exist.
Let’s say we’re calculating humidification loads for a non-critical application with an economizer cycle, using the following parameters:
Desired Space conditions
The formula for determining the quantity of outside air in an economizer cycle is:
V2 = VAH ÷ ([A ÷ B] + 1)
where:
VAH = V1 + V2
V1 = volume of return air (cubic feet per minute)
V2 = volume of outside air (cubic feet per minute)
A = temperature difference between mixed air and outside air
B = temperature difference between return air and mixed air
Plugging our numbers in, this is what we get:
V2 = 12,000 cfm ÷ ([35°F ÷ 15°F] + 1) = 3,600 cfm of outside air
Determining Maximum Humidification Load
Next, using a psychrometric chart or table as demonstrated in the previous blogs, we can determine that the moisture content of the desired conditions of 70°F and 35-percent RH is 2.40 lb per hour per 100 cfm. We need to determine the worst-case moisture content of the outside air for the specific location to calculate the maximum humidification load.
Table 11-1 in the Dristeem Design guide shows the values for various cities. If we’re calculating the load for a non-critical application, we can use the daily minimum % RH. However, if the application is critical, the recommendation is to use the extreme minimum daily % RH for the year. For example, in Minneapolis, MN, the average daily minimum RH for the year is 51% and the extreme daily minimum RH is 20% for the year. Knowing this, we can determine the maximum load for this system by using the following formula:
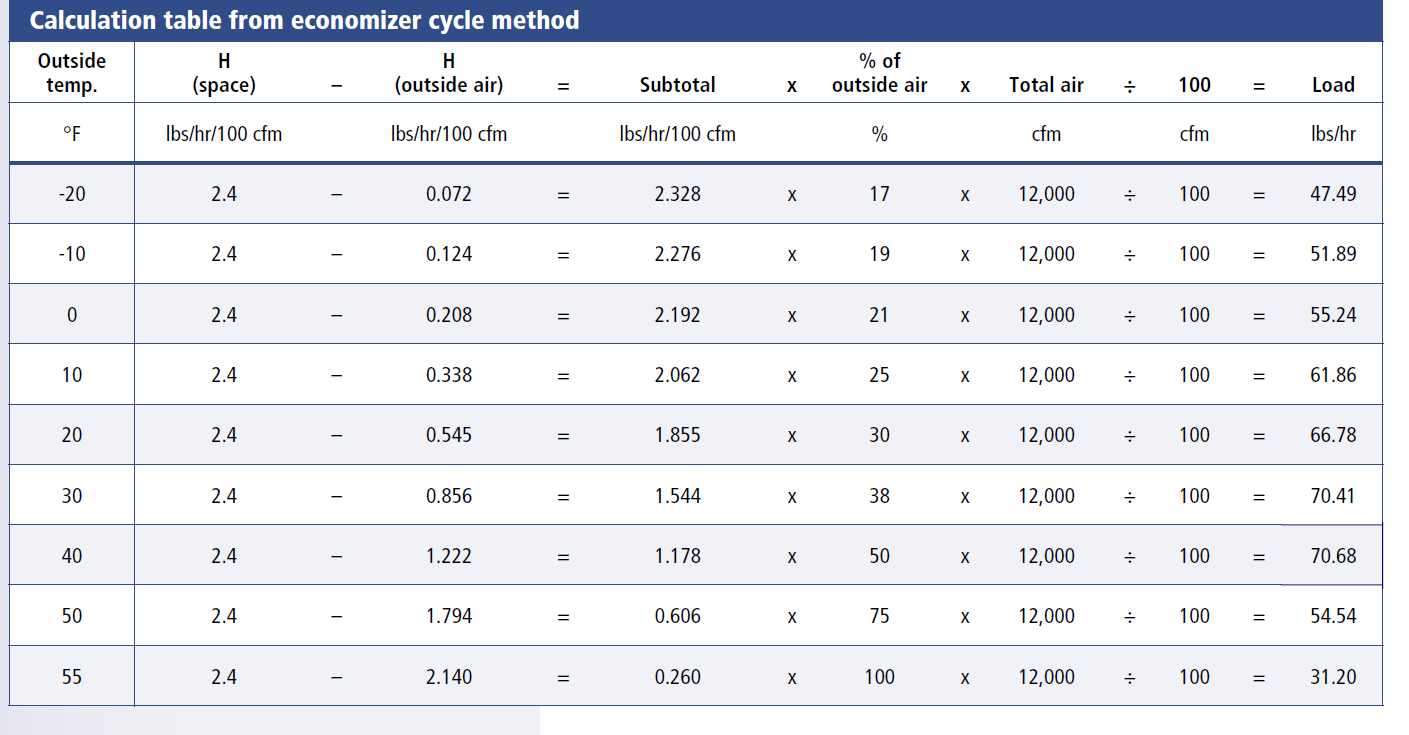
(H [space] – H [outside air]) × percentage of outside air × (cubic feet per minute [total air] ÷ 100 cfm) = pounds per hour (load).
The table below shows the data created from this formula in 10-degree increments of outside air for Minneapolis:
The maximum humidification load for this application is 70.68 lb per hour, which occurs when the outdoor temperature is 40°F.
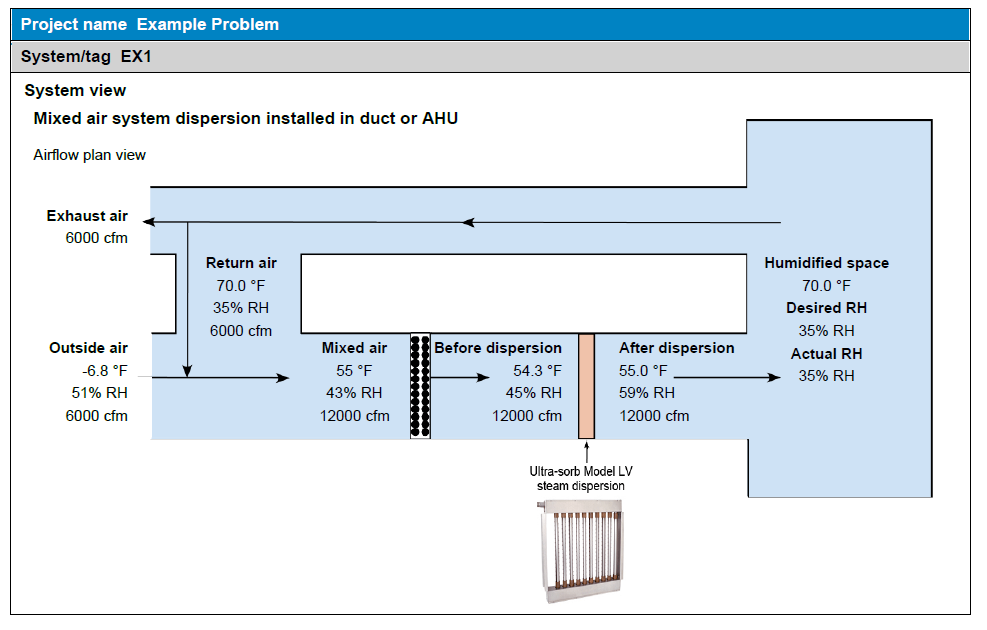
Of course, it’s a lot easier to simply use a program like DriSteem’s DriCalc tool. You’ll still need to know your Total CFM and your mixed-air temperature, but the program will do the rest of the heavy lifting. Keep in mind that you’ll still have to specify the outdoor RH either as the Daily Extreme Minimum or the Average Outside Conditions. After that, it’s smooth sailing. DriCalc provides several handy printouts, including this installation diagram with all of the pertinent data and selection.
Part One: Humidification Basics: Why We Humidify in Building Design
Part Two: Humidification Basics Part 2: Mastering Humidification Terms
Part Three: Psychrometrics Made Easy: Humidification Basics Part 3
Part Four: Calculating Natural and Mechanical Loads: Humidification Basics Part 4


