Printer Friendly (PDF)
In many ways, Psychrometrics is like a Rubik’s Cube. Change one thing, and you automatically change something else. But instead of shifting colored cubes around, we’re shifting measures of air, moisture, and temperature. And, like the Rubik’s cube, there is more than one way to arrive at our goal of a perfected conditioned space. Specifically, there two basic strategies or processes: Isothermal and Adiabatic. Today we look at steam isothermal humidification.
But let’s not get hung up on the terminology just yet. Let’s go back to manipulating the factors that will ultimately bring us to our goal, which varies from application to application, to achieve a space temperature of about 70° at 35-50% RH, depending on the season. Instead of twisting the sections of a Rubik’s cube, we’re going to slide things around on a psychrometric chart.
What is Steam Isothermal Humidification?
Remember from our earlier blogs that it takes approximately 1000 BTUs to convert one pound of water into one pound of water vapor. We can see exactly how this works by going back to the psychrometric chart and pretending that we have a steam humidifier in place that will add water vapor to the supply air.
It takes energy to convert water to steam, so any type of steam humidification requires an outside energy source like electricity, natural gas, or a steam boiler. The energy source transfers energy to the water so that it changes from liquid to a vapor.
How does this represent on a psychrometric chart? See the chart below. At point #1 we have 42°F outside air that contains approximately 10 grains of water per pound of air entering our mechanical system. That’s our starting point. Using a steam humidifier to inject vaporized moisture directly into the supply air, we bring the RH up to 85% by adding 23 grains of moisture per pound of air (point #2). (The curved lines represent the RH in increments of 10%.)
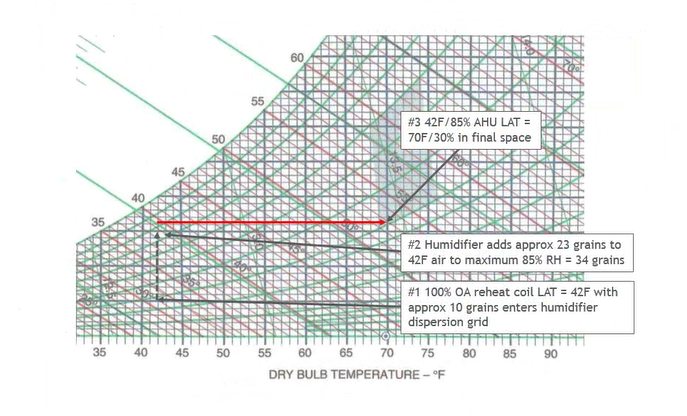
Notice that we haven’t changed the temperature of the supply air, we just added moisture. So we’re moving vertically up the dry bulb line at 42°F. In this example, given our existing space temperature, we can put this humidified air into the space, which is maintained at 70°F. This shifts us directly to the right on the chart, since the supply air is now exposed to a different dry bulb temperature (70°F). This in turn drops the RH down to a more suitable 30% (point #3).
This is what we call an isothermal humidification process, which technically means that we’re increasing humidification without changing the air temperature. Rather, we directly add steam to the supply air, which changes the supply RH. We then put the humidified air it into a warmer space, which automatically causes the RH to drop.
This process of humidification works very well in systems with:
- A low supply air temperature (because of absorption distances)
- Short but predictable absorption distances so that you don’t rain in the duct
- An onsite steam boiler
- A requirement for extremely accurate control
We use this method often in typical institutional systems.
Catch up on the entire series:
Part One: Humidification Basics: Why We Humidify in Building Design
Part Two: Humidification Basics Part 2: Mastering Humidification Terms
Part Three: Psychrometrics Made Easy: Humidification Basics Part 3
Part Four: Calculating Natural and Mechanical Loads: Humidification Basics Part 4
Part Five: Calculating Humidification Loads for Economizer Cycle Systems: Humidification Basics Part 5